We’ve been through what is AWS and it’s advantages. Now, let’s discuss what are ec2 and LightSail in AWS? How does AWS EC2 work? What are the benefits of using them? How to create your own virtual machine using ec2? Let’s take this shot and find out.
Compute is one of the core services offered by AWS. While there are many computing services offered by AWS, we’ll focus on just 2 today. One in particular. (1)EC2 (2)LightSail. Before getting into the technical stuff, let’s answer some basic questions first. Why do we need a computing service?
In order to power your business, you need some sort of computing capacity available to you to run applications.
For those of you who don’t know what does computing capacity means, it refers to the storage and transaction processing capability of computer systems, the network, and/or the datacenter. In a traditional environment, you would first need to estimate how much compute capacity you’re going to need, buy the necessary hardware to support that capacity, and stand up the computers/servers to run your application on. Once you deploy your application to those servers, you must maintain that server from the physical maintenance perspective, as well as from a software perspective.
In contrast, when you’re building cloud-native applications, you can shift to using a CAAS (compute as a service) model, which allows you
- to provision and consume raw compute capacity over the internet.
- flexible pricing(pay as you go)
- no burden of standing up and maintaining those physical servers
- to have control over what type of hardware you need to run and the software that runs on top of it
What is EC2 in AWS?
Now that we know what is a compute service. Let’s now shift our focus to ec2, and how to create your own virtual machine. What is EC2? It stands for Amazon Elastic Compute Cloud. Amazon Elastic Compute Cloud (Amazon EC2) is a web service that provides secure and resizable compute capacity in the cloud. It’s designed to make web-scale cloud computing easier for developers. Or in simple words, ‘don’t worry about the hardware, leave that to amazon‘.
Note – For people belonging to a non-tech background, this article might contain some words you are not familiar with. If you have any doubts or problems in understanding any of those, drop a comment & I’ll get back to you ASAP.
Each machine/virtual server we provision is called an EC2 instance. You can do all the things to an EC2 Instance that you can do with a traditional server. So if someone asks, “is ec2 is a virtual machine?” you go ahead and say a big fat YES!
We now know what is EC2. But why EC2? What are the benefits of AWS EC2?
- EC2 instances are flexible, and you configure them to meet your needs
- you can commission one or many instances easily, and
- at the end of the billing cycle, you only pay for what you use
- when you no longer need an instance, terminate or stop that instance, and you will stop incurring charges.
Quite dependable and efficient I’d say, right? Well, there are many more features of EC2 but the above-mentioned are what makes it more suitable than its competitors.
How is AWS EC2 billed?
EC2 pricing is based on the hours and size of an instance, region, and operating system.
How does AWS EC2 work?
Wohooo! Here we are, launching our first EC2 instance. Exciting 😛
How do you setup AWS EC2?
Step 1
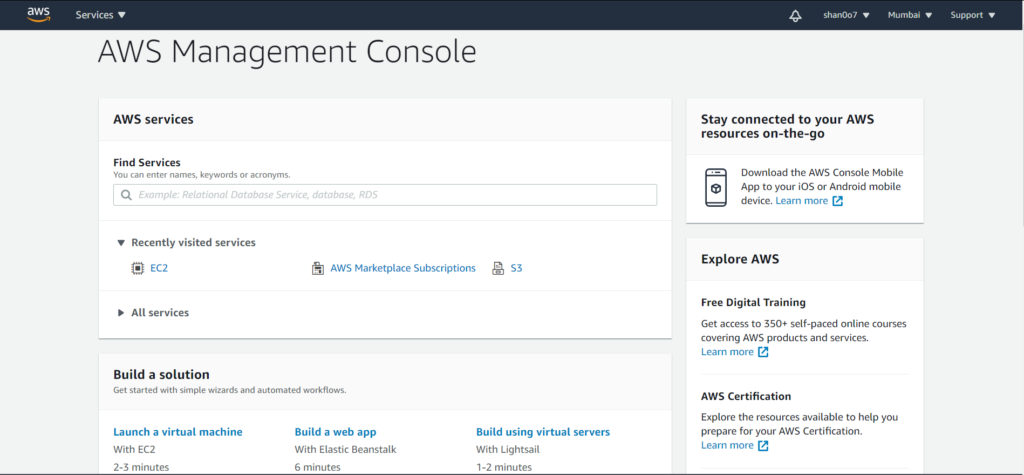
First steps first. Register an AWS account. Log into the management console. It’ll look something like this.
- Under the ‘Build a solution’ tab, click on Launch a virtual machine with EC2.
Step 2
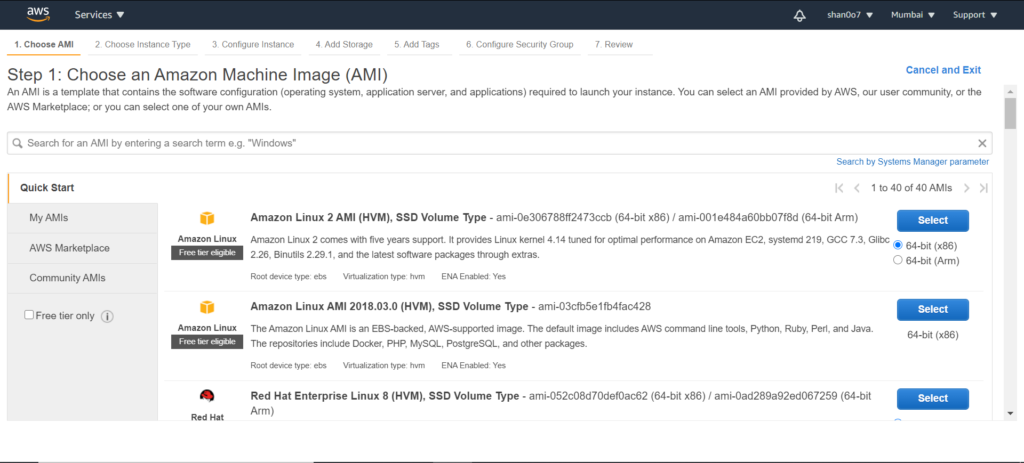
Choose an Amazon Machine Image (AMI). Now, what is an AMI? In simple words, it’s a blueprint of what type of software you want your machine to have. For eg. operating system – you can choose b/w windows, ubuntu, Linux…… and many more.
- For now, just we’ll go with Amazon Linux 2 AMI (HVM), SSD Volume Type because it’s free tier eligible.
- Select it, and we’ll be moved to a screen to select an instance type. Do you remember what an instance is? If not, scroll up.
Step 3
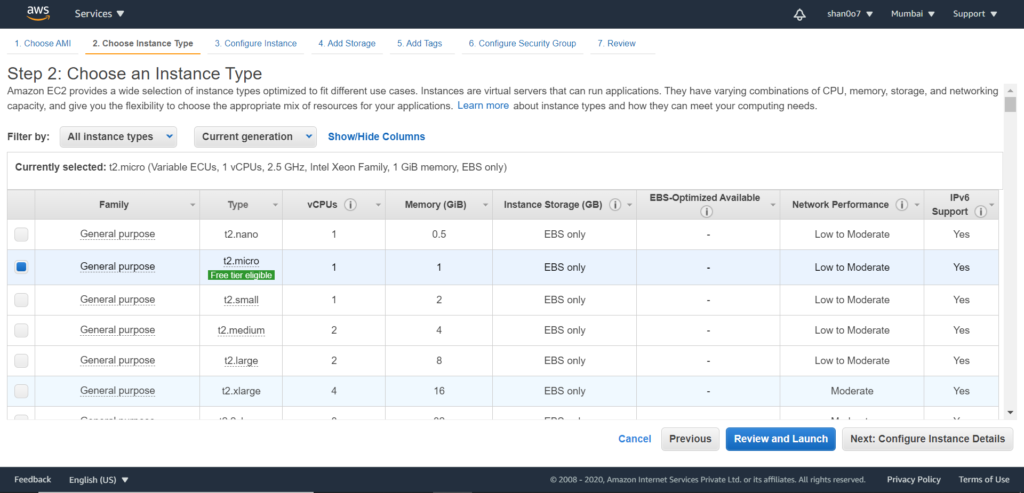
An instance type, again, is what is controlling the underlying hardware, and the capacity that hardware can support.
- We’re going to select a t2 micro because it’s Free Tier eligible, and we’ll just click Next to configure the instance details for that instance.
Step 4
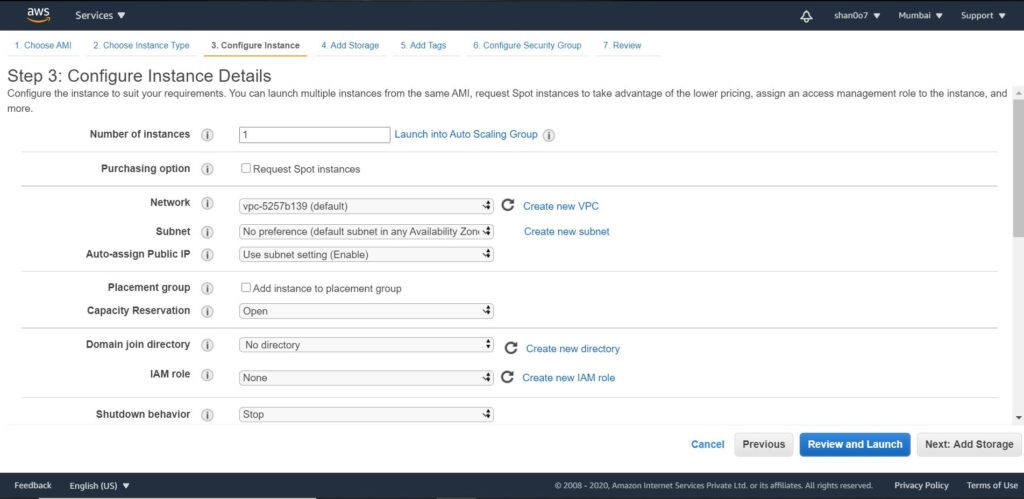
Don’t worry about the technical details. Just leave all the options as defaults for now. I’ll cover this later.
Step 5
- Click next to add storage. Leave as defaults.
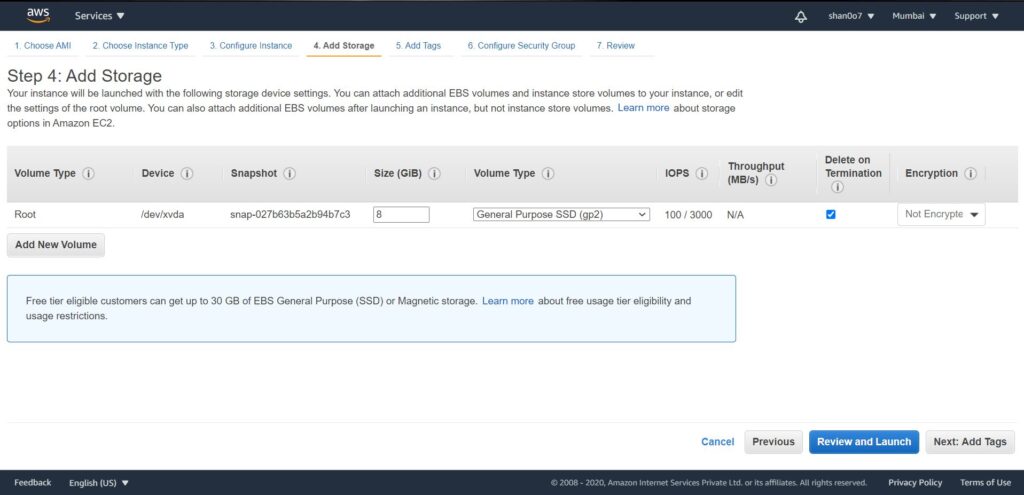
- Click next to add tags.
Step 6
Tags are a feature that allows you to categorize your EC2 instances. For example the name of the department. For now, just add a tag ‘NAME’ and assign it a value ‘DEMO’.
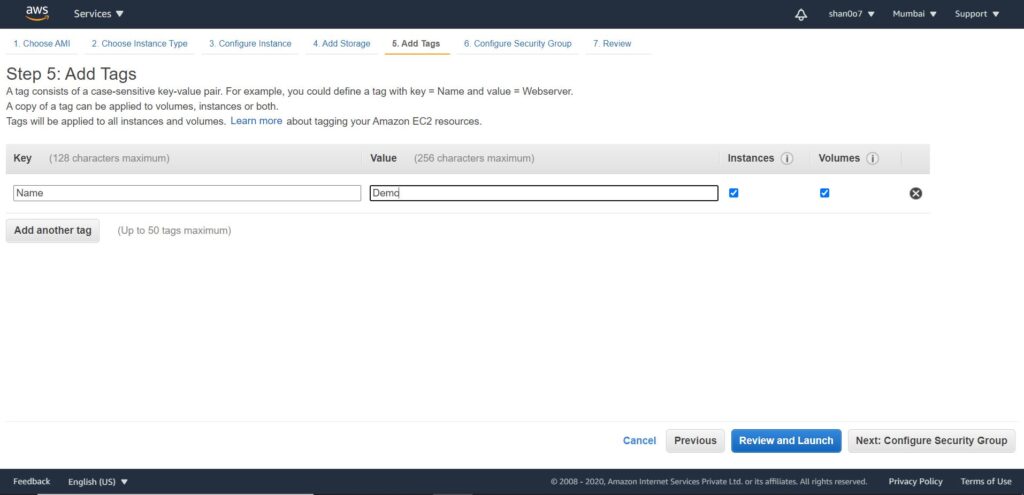
- Click Next to configure the security group. Again, defaults.
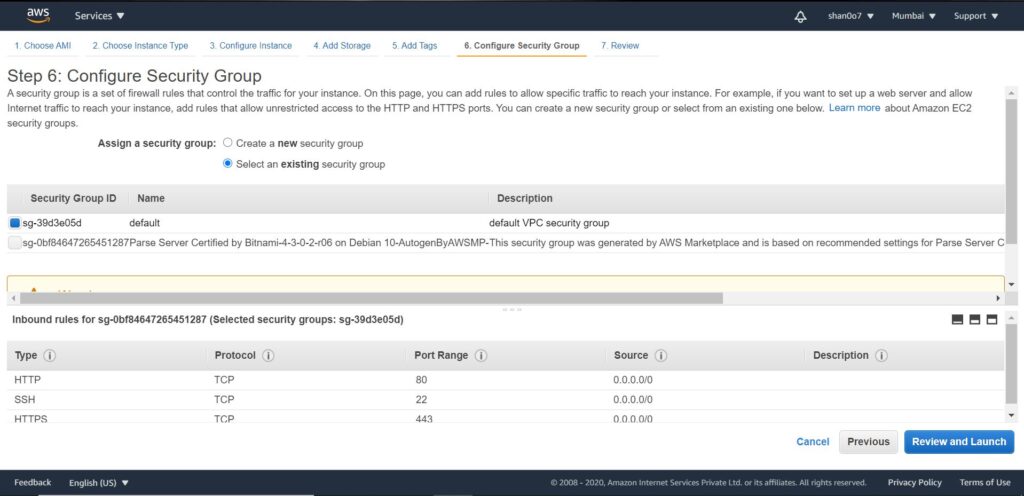
Review & launch
- Review and Launch. Voila. Done!
- We have a Linux machine that we’re going to be launching. Our instance type is t2.micro. If we scroll down, we can also see the tag that we defined as well. All right, so let’s go ahead and click Launch, and see what we got.
- Here we just have to acknowledge that we have a private key pair for this. We’re not going to worry about this for now, we’ll just go ahead and select acknowledge, and launch the instance.
- Scroll down, click on view instances.
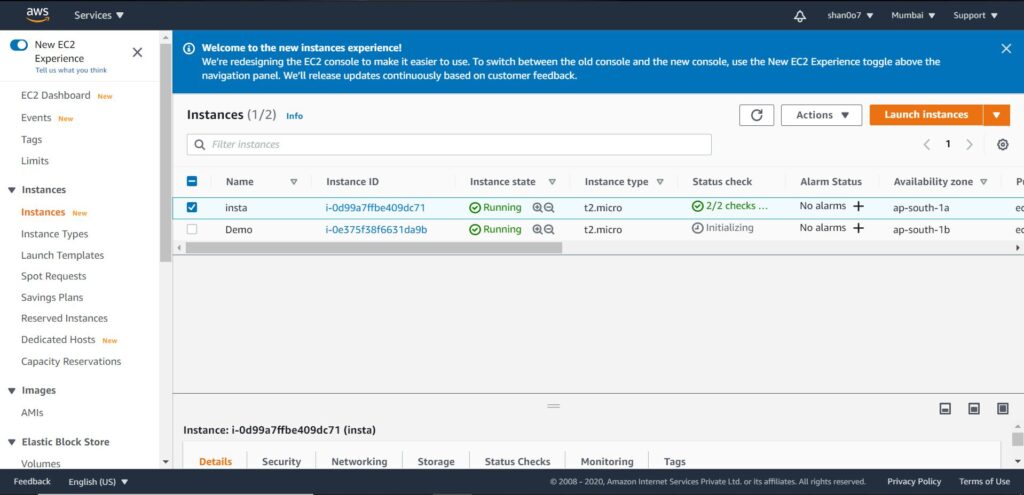
Now that we’re back at the EC2 dashboard, we can see that our instance state is running, but the status checks are initializing. We’re going to wait for those status checks to pass then we can check our instance via its public IP.
That’s it. You created your own virtual machine using Amazon EC2. Easy. You might still be wondering about the technicalities we skipped as defaults. Don’t worry. You’ll understand each one as we go through the coming shots.
Are EC2 Instances Resizable?
This part is a solely technical so don’t worry if you don’t understand a word.
You can resize instances in Amazon EC2 if the new instance types are compatible by:
- Virtualization type – Linux AMIs are either paravirtual (PV) or hardware virtual machines (HVM). You cannot resize an instance that was launched as a PV to an instance of HVM.
- Architecture – New instances types can only be launched to the same processor architecture. For example, 32-bit AMIs can only be resized to other 32-bit instances.
- Network – You cannot resize to an EC2-Classic from newer instance types. Newer instance types must be launched in a VPC.
- Enhanced networking – Enhanced networking requires necessary drivers, and you cannot resize to an instance that does not support them.
- NVMe – To resize to instances that use NVMe, you must first install the NVMe drivers on your existing instance.
What is Amazon LightSail?
Some of you though, you just want to simplify the whole process. You don’t want to be a developer or go through the process of spinning up an EC2 instance. You just want a solution to running your application. Well, AWS has a solution called LightSail, that has a number of pre-built options, you simply select, launch, and you’re done.
For example, you might just want a WordPress site. LightSail has one already built for you. All you have to do is select it, and for a few dollars a month, all of the management is taken care of on AWS’s side.
Remember, the reason AWS exists is to help eliminate your undifferentiated heavy lifting. So, AWS automatically provides the secure network, SSD storage, and load balancing you need. Amazon takes care of all the backups and computes all these things that make up those pieces of your application, now we are just there for you, all you have to worry about is the content.
Next Shot
In the next shot, as I promised, I’ll be explaining Networking & Storage in AWS specifically. Remember in one of the steps where we needed to configure instance details, there were options such as network, role…. which we skipped as defaults. We’ll cover those under Networking. And step 5, where we added storage. In the coming shot, we’ll learn specific storage configurations.
See ya!

